
Table of Contents
Introduction
Welcome to this comprehensive guide to HTML for beginners. HTML, or HyperText Markup Language, is the standard language used to create web pages. It’s a fundamental technology behind the Internet, and understanding HTML is crucial for anyone looking to delve into web development or design. This guide will walk you through the basics of HTML, its history, syntax, and structure, and provide practical examples and resources for further learning.
A Brief History of HTML
HTML was created by Tim Berners-Lee in 1991. It has since undergone several updates, with the latest version being HTML5. Each version brought new capabilities to the web, making it more interactive, accessible, and user-friendly.
Fundamentals of HTML for Beginners
We’ll now share with you a comprehensive guide on HTML for beginners that will provide you a good starting point in your journey towards learning web development.
An HTML document is structured as a tree of elements, each represented by a tag. This structure ensures that the web browser can read and display the web page as intended by the developer. Below is a more detailed explanation of each element in the basic structure of an HTML document:
Basic Structure
An HTML document is structured as a tree of elements, each represented by a tag. This structure ensures that the web browser can read and display the web page as intended by the developer. Below is a more detailed explanation of each element in the basic structure of an HTML document:
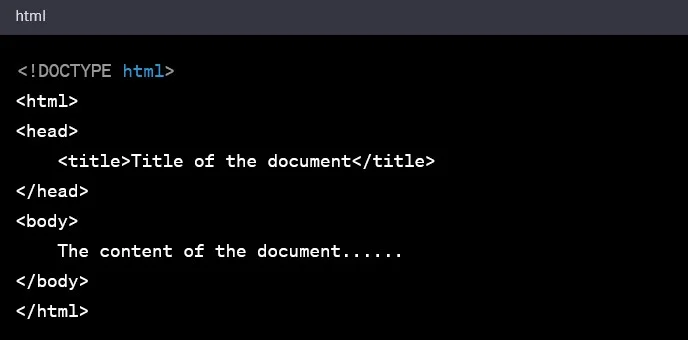
<!DOCTYPE html>
- Purpose: Declares the document type and version.
- Details: This declaration is essential for the browser to understand that the document is an HTML5 document. It must be the very first thing in your HTML document, before the
<html>tag.

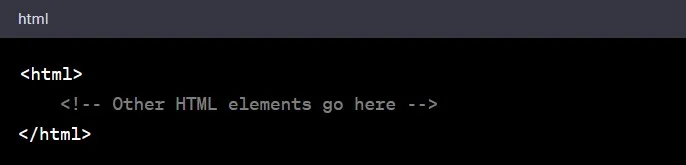
<html>
- Purpose: The root element that contains all other HTML elements.
- Details: The
<html>tag is the container for all other HTML elements (except for the<!DOCTYPE>declaration). It tells the browser that everything enclosed within is HTML code.
<head>
- Purpose: Contains meta-information about the HTML document.
- Details: The
<head>element holds information such as the title, meta tags (which can provide information about the document, such as character encoding), links to stylesheets, and more. This information is not displayed on the page content but is essential for the browser.

<title>
- Purpose: Specifies the title of the HTML document.
- Details: The text within the
<title>tags is displayed on the browser’s title bar or tab. It is crucial for SEO and gives users an idea about the content of the page.

<body>
- Purpose: Contains the content of the HTML document.
- Details: The
<body>element holds the content that is visible to the user, such as text, images, links, buttons, and other elements. It is where you put the main content of your web page.
Tags and Elements
In HTML, the terms “tags” and “elements” are often used interchangeably, but they have slightly different meanings. Below is a detailed explanation to give you a clearer understanding.
What are Tags?
- Definition: Tags are the hidden keywords within a web page that define how your web browser must format and display the content. Most tags must be opened (‘
<tag>') and closed (‘</tag>') with the content in between. - Syntax:
- Opening Tag: ‘
<tagname>‘ - Closing Tag: ‘
</tagname>‘ - Example:
'<p>This is a paragraph.</p>‘
- Opening Tag: ‘
- Self-Closing Tags: Some tags, such as the break (‘
<br>') or image (‘<img>') tags, don’t have a closing tag because they don’t enclose any content.
What are Elements?
- Definition: An element is a complete set, including the opening tag, the content, and the closing tag (or just a self-closing tag).
- Example: ‘
<p>This is a paragraph.</p>‘- Opening Tag:
'<p>‘ - Content:
This is a paragraph. - Closing Tag:
'</p>‘
- Opening Tag:
- Self-Closing Element Example:
'<img src="image.jpg" alt="An example image">‘
Types of HTML Tags
- Container Tags: These tags require both opening and closing tags.
- Example:
<p>...</p>,<h1>...</h1>,<div>...</div> - Usage: Used to contain and format the content within them.
- Example:
- Empty or Void Tags: These are self-closing tags and don’t require a closing tag.
- Example:
<br>,<img>,<hr> - Usage: Used for elements that have no content, such as line breaks, images, and horizontal lines.
- Example:
Attributes in Tags
- Definition: Attributes provide additional information about an element and are included in the opening tag. They are always included in the opening tag (or the self-closing tag). Common attributes include
'id‘,'class‘,'style‘, and'src‘. - Syntax:
'<tagname attribute="value">‘ - Example:
'<img src="image.jpg" alt="An example image" width="500" height="300">‘- ‘
src': Specifies the path to the image file. - ‘
alt': Provides alternative text for the image.
- ‘
Nesting of Elements
- Definition: Placing one element inside another is called nesting.
- Example:
- Importance: Proper nesting is crucial for the correct display and functionality of web content. Incorrect nesting can lead to visual and functional issues on the web page.
Creating a Simple Web Page
This section will provide guidance on HTML for beginners and will help them in creating a simple web page. Here’s how to create a basic web page with HTML:
1. Open a Text Editor
What is a Text Editor?
A text editor is a software application used for editing plain text files. Unlike word processors, text editors don’t add formatting to texts, making them ideal for coding.
Examples of Text Editors:
- Windows: Notepad is a basic text editor that comes pre-installed.
- Mac: TextEdit is the default text editor, but ensure it’s in plain text mode (‘
Format > Make Plain Text‘). - Advanced Options: Software like Visual Studio Code, Sublime Text, and Atom are more advanced text editors designed specifically for coding with features like syntax highlighting and auto-completion.
2. Copy and Paste the Basic HTML Structure
Why Start with a Basic Structure?
The basic structure provides a template or skeleton for your web page. It ensures that the essential elements are in place, allowing browsers to interpret and display your page correctly.
The Basic Structure:
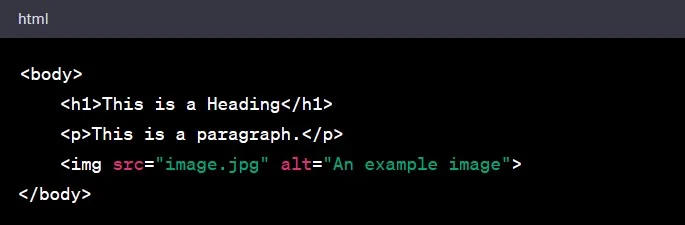
3. Add Your Content within the <body> Tags
The Role of the <body> Tag:
The '<body>‘ tag contains all the content that you want to display on your web page, such as text, images, links, videos, and more.
Adding Content:
- Text: Use tags like
<h1>,<h2>,<p>for headings and paragraphs. - Images: Use the
<img>tag and specify the image source with thesrcattribute. - Links: Use the
<a>tag to create hyperlinks. - Lists: Use
<ul>for unordered lists and<ol>for ordered lists, with<li>for list items.
4. Save the File with a .html Extension
Why the ‘.html' Extension?
The ‘.html' extension tells the computer that this is an HTML file. Web browsers can then open and interpret the file correctly.
Saving the File:
- In your text editor, go to
File > Save As. - Choose a location to save your file.
- Name your file (e.g.,
'index.html'). Ensure it ends with the ‘.html'extension. - Click
Save.
5. Open the File in a Web Browser
How to Open the File:
- Locate the saved
.htmlfile on your computer. - Double-click on the file. It will typically open in your default web browser.
- Alternatively, you can drag and drop the file into an open web browser window.
Viewing Your Web Page:
Once opened in a browser, you’ll see your content displayed as a web page. This local view is how your content will appear on the internet, though it’s currently only accessible on your computer.
HTML5: New Features
HTML5 introduced new elements and attributes for more interactive and semantic web content. Some notable features include:
- New parsing rules for enhanced flexibility.
- Native support for audio and video embedding.
- New elements like ‘
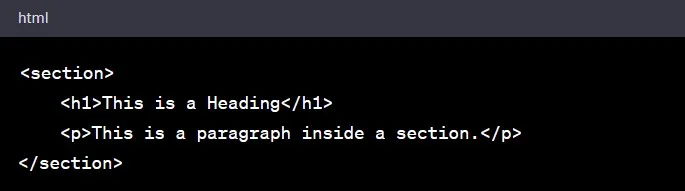
<article>‘, ‘<section>', ‘<nav>', and ‘<figure>'
Best Practices
Here we’ll provide some best practices on HTML for beginners which will help them in improving the quality of their web pages.
- Use semantic elements to enhance the structure and accessibility of your web content.
- Validate your HTML code using the W3C HTML validator to ensure it adheres to web standards.
- Keep learning! HTML is constantly evolving, and staying up-to-date with the latest trends and best practices is crucial for effective web development.
Conclusion
Understanding HTML is the first step in your web development journey. So, this guide has provided a basic overview of HTML for beginners, its structure, and its features. As you continue to explore and practice, you’ll gain a deeper understanding and mastery of HTML, laying a solid foundation for more advanced web development skills.
If you want to further learn HTML, please refer to the following resources:
Happy coding!